Offline Registry Edit
- 0 Comments
- October 31, 2016
- by admin
- Technical Instruction
- Leave a comment
If you have ever made a registry change that has caused your system to no longer boot, or changed your password and forgot it :-(, then this post will help a lot. In this post I will go over how to edit the registry from your bootable media (i.e. windows 7 full install disc).
Follow these steps:
1. power on the system and press the key required to enter a boot menu (i.e. esc, f9, f10, f11, f12, or del)
2. insert your windows 7 cd and select your disc drive as the "boot from" option
3. you should now see a prompt to "press any key to boot from cd" press the spacebar
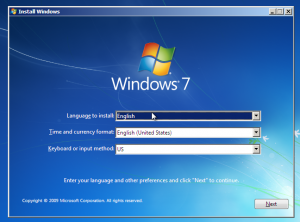
4. the next prompt you will see will allow you to select your "language", "time and currency settings", and "keyboard or input method". make your selection and click next
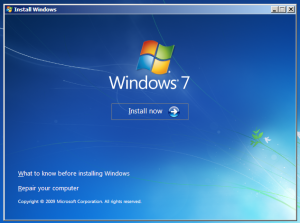
5. the next prompt you see will be the "install windows" screen giving you the option to "install windows" or to the lower left 2 other options "what to know before installing windows" and "repair your computer" you will select the option "repair your computer"
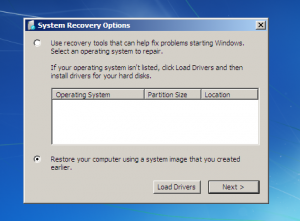
6. next you will see a screen asking how you would like to repair your version of windows. select the radio button "use recovery tool that can help fix problems starting windows". then choose your operating system (most will have only one) and choose next.
7. the following prompt will have several choices ranging from "startup repair" to "memory diagnostics" you will select the option for "command prompt". this will open a command prompt window.

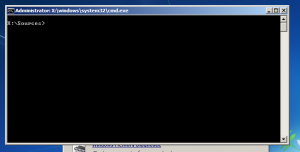
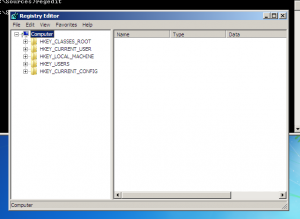
8. in the command prompt type "regedit" and press enter. this will open the registry editor.
9. now click HKEY_LOCAL_MACHINE
10. now click "File" and choose "Load Hive"
11. determine the database file that contains the registry hive you want to edit:
HKEY_LOCAL_MACHINE \SAM = %windir%\system32\config\SAM
HKEY_LOCAL_MACHINE \SYSTEM = %windir%\system32\config\SYSTEM
HKEY_LOCAL_MACHINE \SOFTWARE = %windir%\system32\config\SOFTWARE
HKEY_USERS \.Default = %windir%\system32\config\DEFAULT
HKEY_CURRENT_USER = %userprofile%\ntuser.dat
12. select the file you wish to edit and click open. (in the case of enabling the built-in administrator account you will select the SAM file.)
13. you will now be prompted to input a name, this is only a name for the key just enter something like test or offline. nothing specific is required.
14. now navigate to HKEY_LOCAL_MACHINE\%yourkeyname%\SAM\Domains\Accounts\Users\
15. make note of the first key name
16. open the "names" subkey
17. choose "administrator"
18. edit the F position of the "binary value"
19. when you see the binary data notice the "0038" position starts with 11 if the account is disabled and 10 if the account is already enabled (if the account is already enabled you will unfortunately be out of luck :-( using this method). if the value is 11 click before the 1 and press delete. now enter 10 and click "Ok".
20. now on the hive tree select "yourkeyname" and open "File" then select "Unload Hive"
21. reboot the computer and you should now see an additional login account for the Administrator.
22. Choose the Administrator account. Login and navigate to the control panel, select user accounts, choose the locked account and select "remove password" once you reboot you should be able to login to your account which you were previously locked out of.
Good Luck.
0 Comments